
My very first "decal"
Now before you start freaking out about putting duct tape on the wall, don't worry! We're not sticking it straight to the wall. We'll be using paper to back the sticky part of the duct tape, which leaves you free to use whatever adhesive you want. This is great for those apartments where you're afraid to stick things to the wall that may not come off, or you want to limit holes in the walls. I will warn you, both of my really large decals are held up using a few staples in addition to the adhesive, just to help make sure they really stay.
So, here we go! Step one in this process is to figure out what your image is. Now, my first two decals were more of a general "idea" of what I wanted. I wanted a branch, so I just sort of drew it. The second one was a full out tree, so I got a general idea (I used a rubber stamp I found at a craft store), blew up the image as large as I wanted, and came up with my own variation on the original image.

My tree! That's our couch that seats three people comfortably, so about 7-8 feet wide!

The original image (care of tolkiengateway.net)
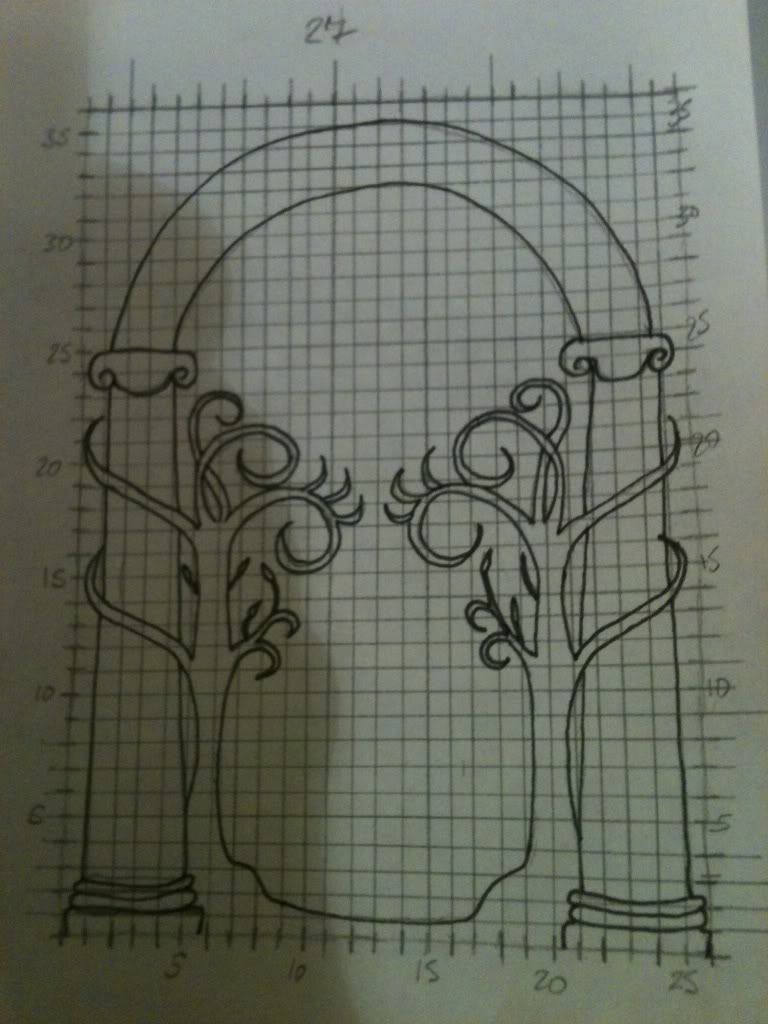
After tracing the basic parts of the original image, we measured our drawing to discover that it was something like 3 1/2" wide and 4 1/2" tall. I drew a grid using 1/8" markings, giving us a grid 27 wide, 37 tall. (Please note, if you're free-handing your drawing, you really don't have to do this step. We just wanted to make sure our proportions were picture-perfect!) We then did some conversions, figuring that because the wall we were putting it on was about 7 1/2 feet tall, 1/8" = 2 1/2".

My lovely roommate measuring out our grid on the giant piece of paper we made! (See the little drawing? That's the original...)
For our paper, we used one of those kids drawing art pads of paper you can get at any large chain store (like Walmart, Fred Meyer, etc.). We used the largest size, 22" x 16", so we could have the most paper with the least number of pages. We taped them together roughly. As long as they're secured together enough not to move around a whole lot, the duct tape will do the solid securing.
TIP: Try to overlap your paper as little as possible. When it comes to the part where you trace your design, you want to be able to see the bled-through ink, which you can't when there are two pieces of paper (or tape!).

Starting to draw one of the trees over the grid. Those holes are from the handles (downside of this kind of paper), which we just backed with some more paper so we wouldn't have holes.
I drew the design starting from the bottom while my lovely roommate continued drawing out the grid. By tag-teaming that part of the procedure, I think we helped reduce some time. I would be sure to draw your design in pencil, even though it's hard to see, because you will make mistakes! I sure did...
TIP: Roll up your paper as you go, especially if your picture is large. No one will see the creases in the paper because it will all be covered with duct tape!

Two steps in one! Make sure to outline your drawing in sharpie, then cover with duct tape!
Next step: outlining the drawing in sharpie. I specify using sharpie because it bleeds through to the other side of the paper, which is the side you'll be cutting out from. You need it to bleed through so you can see, even though the black duct tape. This also will make it clear how accurate your drawing is. As soon as you feel comfortable with your drawing (and have made sure you can see the ink on the other side), cover it with the duct tape!
TIP: Try to keep there from being too much overlap on your duct tape. The thicker it is, the heavier your art will be, and the harder to cut through it will be.

Once your drawing is totally covered in duct tape, flip it over, and start the job of cutting it out! This is actually really fun, but be careful of those overlapping lines! We accidentally cut off one of our little branches...fortunately a nice easy fix, but it still got our hearts pounding for a second when we realized! Scissors are a big help when doing a long haul of duct taping...all that tape ripping starts to really rub your fingers raw after a while. Another tip: if your drawing has lots of little details (which I do caution against doing...little details mean lots of extra time!), purchase an Xacto knife.

All cut out! My roommate did all of the Elvish scripting...so patient!
Now comes the group effort! Invite everyone over for putting it up on the wall, especially if it's big. It took just my roommate and I to put up and secure the pillars/trees section on the wall, but it also took both of our boyfriends to help get the arches up, and then we had some family members come over to help with the Elvish script.
TIP: For the most part, permanent double stick tape is very effective in holding the decals up, but for really large pieces, I do recommend using a few place staples to help hold it up. Poster tape also works well, but is not invisible like double-stick tape.
Ready for the final product?!

Welcome to our apartment! Quite a statement, and it gives our geekier friends a chance to show off by saying the password :)
Also, though this is very time-intensive, I've found wall decals that are similar in size to my tree cost around $200 (or more!). Buying the supplies to make this wall arch cost about $30, including three rolls of black duct tape, the pad of paper, and an x-acto knife.
1 comment:
I've always wanted The Doors of Durin on a wall decal - great job on making it!
Post a Comment